
Mazda OBD-I Diagnostic Guide is a compact offline workshop reference for early Mazda vehicles that use pre-standard diagnostic connectors and blink-code procedures. Instead of pretending to be a universal scan tool, it illustrates the connector, shows a simple LED tester arrangement and organizes checks for the systems exposed by the application.
The package is most useful when a technician has an older vehicle with no modern sixteen-pin workflow and needs to identify the correct terminal and interpret stored flashes. The source package labels the intended vehicle period as the early nineteen-nineties through the end of that decade; connector layout and code meaning must still be confirmed for the exact model, engine, market and control unit.
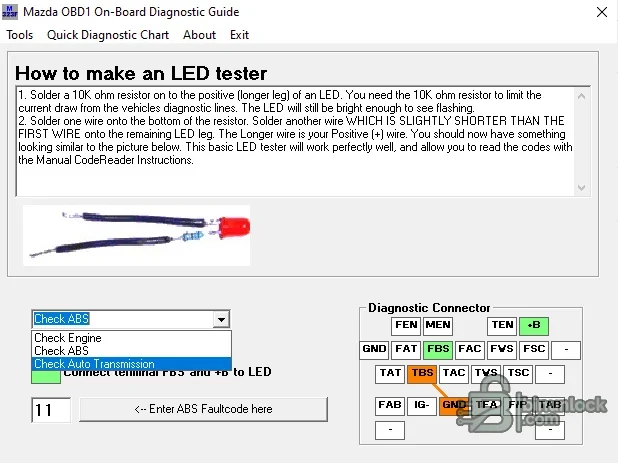
The application is branded specifically for Mazda OBD-I and the source folder identifies an early-model-year range. Its menu exposes engine, anti-lock braking and automatic-transmission checks. It does not prove coverage for every Mazda sold in that period, and it should not be assumed compatible with later OBD-II vehicles, regional connector variants, diesel controllers or modules that use a different self-diagnostic method.
Use the guide as a structured aid for lawful diagnosis, not as permission to probe unknown terminals. Avoid back-feeding control modules, use fused test leads where specified and disconnect equipment before moving harnesses. After repair, confirm normal warning-lamp behavior and perform the subsystem checks required by the Mazda service procedure.
The package is most useful when a technician has an older vehicle with no modern sixteen-pin workflow and needs to identify the correct terminal and interpret stored flashes. The source package labels the intended vehicle period as the early nineteen-nineties through the end of that decade; connector layout and code meaning must still be confirmed for the exact model, engine, market and control unit.
Confirmed functions in the interface#
- Diagnostic connector and terminal-location illustration
- LED tester connection guidance for blink-code retrieval
- Separate checks for engine control, ABS and automatic-transmission systems
- Fault-code reading guidance intended for vehicles using Mazda OBD-I procedures
- Offline operation without a subscription or network connection
Vehicle and controller coverage#
The application is branded specifically for Mazda OBD-I and the source folder identifies an early-model-year range. Its menu exposes engine, anti-lock braking and automatic-transmission checks. It does not prove coverage for every Mazda sold in that period, and it should not be assumed compatible with later OBD-II vehicles, regional connector variants, diesel controllers or modules that use a different self-diagnostic method.
- Confirm model, production date and market from the vehicle identification plate
- Compare connector shape and terminal labels before bridging or probing
- Use the workshop manual for the exact engine and transmission family
- Treat ABS and transmission codes separately from engine codes
Required tools and system requirements#
- Windows computer capable of running a small native 32-bit application
- Correct service information for the exact Mazda model and market
- High-impedance LED test lamp or the manufacturer-specified diagnostic indicator arrangement
- Digital multimeter for verifying ground and supply terminals before connection
- Stable vehicle battery and clean chassis grounds
Recommended diagnostic workflow#
- Record the model, engine, transmission, production date and complaint before opening the diagnostic connector.
- Locate the connector from factory service information and compare every labeled terminal with the guide.
- Verify ground and supply safely; never short an unknown terminal simply because the connector looks similar.
- Connect the approved indicator arrangement and request codes using the model-specific procedure.
- Record the complete flash sequence, including repeats and pauses, before clearing anything.
- Interpret the code against the correct subsystem manual, repair the underlying circuit and retest.
What the guide does not do#
- It does not communicate through a modern ELM327 adapter
- It does not automatically read live data or erase faults
- It does not replace factory wiring diagrams or terminal cautions
- It does not provide ECU programming, immobilizer, key or calibration functions
- It does not guarantee that a generic blink-code list applies to every market
Troubleshooting no-code or unclear results#
- No LED activity: verify tester polarity, connector ground, ignition state and the correct request terminal
- Continuous light: check for an incorrect bridge, shorted circuit or wrong connector identification
- Code repeats do not match: record a video and count long/short pulses again without guessing
- Code clears and returns: diagnose the circuit and component rather than repeatedly erasing it
- Connector differs from the illustration: stop and use model-specific service data
Responsible workshop use#
Use the guide as a structured aid for lawful diagnosis, not as permission to probe unknown terminals. Avoid back-feeding control modules, use fused test leads where specified and disconnect equipment before moving harnesses. After repair, confirm normal warning-lamp behavior and perform the subsystem checks required by the Mazda service procedure.


