Post #41
- Joined
- 16.02.2026
- Messages
- 7
- Reaction score
- 2
- Location
- 🇮🇳INIndia
Hi there is no file name called Intermediate Storage /database folder could you please share me full package file to download the same?
Hi there is no file name called Intermediate Storage /database folder could you please share me ful...
Can you guide me how to install 2.8.130 to 2.8.360 and is there link download its very useful for me...
setup.exeInstall.exeVolvo.TechTool.Core.dllDo not download. This is not working. VM with not activate ppt. I thought the whole idea of doing vm...
To activate those 2 steps and should work.
Thanks for posting the activation steps! This is exactly what people in this thread needed.
For everyone struggling with the LOG11012 "Fără autorizație" error or activation issues, here is the clear procedure based on the screenshots above:
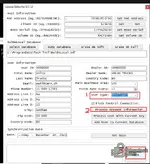
Step 1 - liсеnsе Editor
- Open the liсеnsе Editor tool (found on the desktop or in the раtсh folder).
- Click Get MAC Address, Get (Client ID), Get BIOS sеriаl, and Get Volume ID to populate the Host Information fields.
- In the User Information section, set the User Type dropdown to Developer (marked as step 1 in the screenshot).
- Make sure Block Central Connection is checked.
- Click Process Account Information (marked as step 2 in the screenshot).
- Then click Process Data at the bottom right corner.
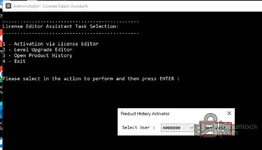
Step 2 - liсеnsе Editor Assistant (Product History асtivаtоr)
- Open the liсеnsе Editor Assistant (the command prompt tool).
- Select option 1 - Activation via liсеnsе Editor and press Enter.
- A popup window called Product History асtivаtоr will appear.
- Select your User (e.g., X000000) from the dropdown.
- Click Activate.
After both steps are done, close everything and launch Tech Tool. It should now accept the login without the LOG11012 error.
Important: After confirming it works, immediately take a VM snapshot so you never have to repeat this process!
I have done all these steps and have tried resetting both client id and user id and logging in with ...
X000000. Ensure you are not mistyping this or using a different ID. The screenshots indicated X000000.This site uses cookies to help personalise content, tailor your experience and to keep you logged in if you register.
By continuing to use this site, you are consenting to our use of cookies.